Have you looked at some of the amazing, gorgeous art that is being produced and wondered how can I do that? You might have even dabbled in using some of the AI art making tools out there, but never seem to get close to those amazing images that other people make. Midjourney has become a go-to tool for many online creators (including myself!), but like a lot of AI tools out there, getting quality output under any AI model (Chat GPT, Bard, etc.) is heavily dependent on your inputs into the system via your prompts. This article will help explain some of the different types of prompts you can enter into Midjourney to give you the output you want.
I have been using Midjourney to help me with my art for six months now, and I’ll be the first to admit that Midjourney’s front end isn’t the most intuitive. It can take a bit of time to get the hang of it. But don’t worry — I’ve got you covered. In this guide, I’ll be sharing some of the insights I’ve gleaned from my own journey with Midjourney, helping you navigate the platform and make the most of its powerful features. Also, to give you a helping hand with Midjourney, I have included 3 top tips to help you get started.
From adjusting the focus of your image with weights to playing with aspect ratios to enhancing the quality and introducing a dash of chaos, Midjourney puts the power of AI art creation right at your fingertips. So, whether you’re a seasoned AI artist or a curious beginner, this guide is for you. Let’s dive in and start creating some AI masterpieces!
Let’s get down to it.
Starting off your Journey
When I started looking into on how to make AI art, Midjourney was one of the names that started to show up as well as Discord. Lets have a quick look at what they both are, and how they relate to each other.
Discord is a communication platform designed to bring people together. It’s the sort of place where you can belong to a school club, a gaming group, or a worldwide art community. It makes it easy to talk every day and hang out more often. You can use Discord on various devices, including your desktop, mobile phone, or directly in your web browser.
Midjourney is a unique feature on Discord. It’s a text-to-image AI where your imagination is the only limit. It’s an official server with millions of members. With Midjourney, you can create custom images from simple text prompts, making it a creative and interactive tool for Discord users.
To get started with Midjourney on Discord, follow these steps:
- Log In To Your Discord Account: Before joining the Midjourney Discord server, you must have a verified Discord account. If you don’t have one, you can create an account on the Discord website
- Subscribe to a Midjourney Plan: Go to http://Midjourney.com/account and sign in with your verified Discord account. Choose a subscription plan that suits your needs.
- Go to Discord and Add the Midjourney Server: To join the Midjourney server, press the + at the bottom of the server list on the left-hand sidebar. Press the Join a Server button and paste or type http://discord.gg/midjourney.
- Go to any #General or #Newbie Channel: On the Midjourney Official Server, select any general-# or newbie-#channel visible in the left sidebar. You can generate images with the Midjourney Bot on any Discord server that has invited the Midjourney Bot.
- Use the /imagine Command: Type /imagine prompt: or select the /imagine command from the slash commands pop-up. Type a description of the image you want to create in the prompt field and send your message.
- Accept the Terms Of Service: The Midjourney Bot will generate a pop-up asking you to accept the Terms of Service. You must agree to the Terms of Service before generating any image.
- Processes the Job: The Midjourney Bot takes about a minute to generate four options. You use some of your subscription’s GPU time each time you create an image.
- Save Your Image: Click on the image to open it to full size, then right-click and choose Save Image. On mobile, long-tap the image and then tap the download icon in the top right corner.
Remember, you can always get help or have questions answered using the /help or /ask commands on the Midjourney Bot.
Mid Journey Tip #1
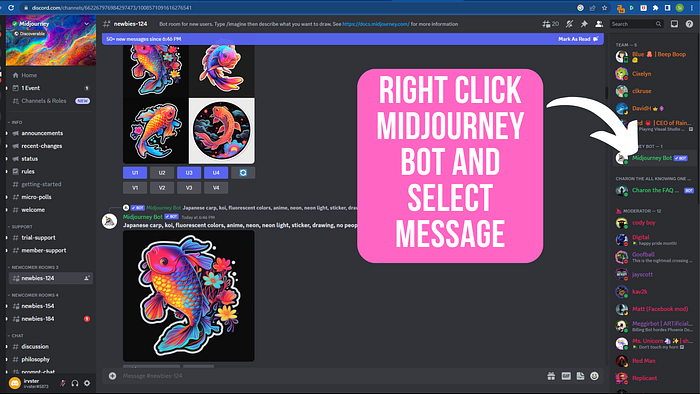
This one took me about 4 months to figure out!!, but one of the great features of Midjourney is the ability to create art privately by sending a direct message to the Midjourney bot. This allows you to work on your creations in a private space, away from the all-seeing public eye. It’s a bit like having your own personal art studio, where you can let your creativity run wild without any distractions or interruptions.
To start creating privately, all you need to do is send a direct message to the Midjourney bot with your prompt. The bot will then generate your AI art based on your prompt and send it back to you in a direct message. It’s that simple!
This feature is particularly useful for those who are new to Midjourney and want to get a feel for the platform before sharing their work publicly. It’s also great for seasoned users who want to experiment with new prompts or styles without influencing their public portfolio.

Mid Journey Costs
Midjourney offers a range of subscription plans to cater to different needs and budgets, each with its own unique benefits. Let’s break them down:
- Free Trial: This is a great way to dip your toes into the world of Midjourney. It offers 0.4 hours of Fast GPU time for life and unlimited Relax GPU time per month. You can work solo in your direct messages and rate images to earn free GPU time.
- Basic Plan: At $10 per month (or $96 per year, which works out to $8 per month), this plan gives you 3.3 hours of Fast GPU time per month and unlimited Relax GPU time. You can purchase extra GPU time at $4 per hour. This plan also allows you to work solo in your direct messages, use stealth mode, and rate images to earn free GPU time.
- Standard Plan: For $30 per month (or $288 per year, which works out to $24 per month), you get 15 hours of Fast GPU time per month and unlimited Relax GPU time. You can purchase extra GPU time at $4 per hour. This plan also includes all the features of the Basic Plan.
- Pro Plan: At $60 per month (or $576 per year, which works out to $48 per month), this plan offers 30 hours of Fast GPU time per month and unlimited Relax GPU time. You can purchase extra GPU time at $4 per hour. This plan allows you to have 12 concurrent Fast jobs, 3 concurrent Relaxed jobs, and 10 jobs waiting in the queue. It also includes all the features of the Standard Plan.
All plans include access to the Midjourney member gallery, the official Discord, and general commercial usage terms. If you’re a company making more than $1,000,000 USD in gross revenue per year, you must purchase the Pro Plan.
You can manage your subscription, switch plans, or cancel at any time by visiting your account page on the Midjourney website. If you run out of Fast GPU time and want to buy more before your monthly subscription renews, you can purchase additional Fast GPU hours for $4 per hour.
Improving the quality of your Midjourney art
Another important parameter to be aware of in your prompting is the quality parameter. This determines the clarity and detail of your image. A higher quality setting will result in a more detailed and clearer image, but it will also consume more GPU hours. Conversely, a lower-quality setting will save on GPU hours but may result in a less detailed image. Who cares! you might ask, I always want the best quality! Depending on which plan you are on, free or paid, will determine how many CPU hours you are entitled to. Something to bear in mind if you want to produce hundreds of images.
To adjust the quality in Midjourney, you can use the ‘–quality’ parameter in your prompt. For example, if you want a high-quality image of a cityscape, your prompt might look something like this: “A bustling cityscape at dusk –quality 2”. This will generate a high-quality image, but remember, it will also consume more GPU hours. You can amend you prompting as follows: by amending the parameter to 0.25 you will get rough images but will be produced fast, 0.5 will produce slightly better images, the default value is 1, and if you prompt with the value of 2, these images will be the best quality, but will be slower to produce.
Mid Journey Tip #2
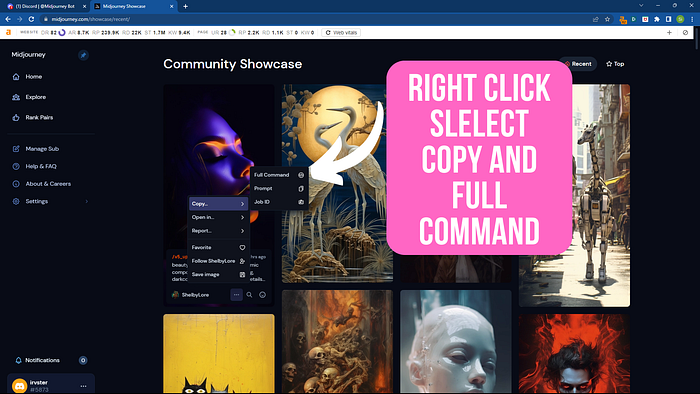
There are so many different styles and possibilities for your pictures, it is hard sometimes not to feel overwhelmed. One of the things I do is head over to the Gallery at Midjourney: https://www.midjourney.com/showcase/recent/ which is regularly updated. If you let your mouse hover over an image you like, a menu appears. Click on the 3 dots, and select COPY, then FULL PROMPT. You can then paster this into the Midjourney IMAGINE prompt to get a picture with a similar style. It might take a few goes and a bit of playing around but should be enough to get you started.
Adjusting Size of your Images in Midjourney
One feature handy reature in prompting is the ability to change the size and aspect ration of your artwork. The standard format is 1:1 but you can alter this and produce land scape and portrait artwork, by adding AR and the aspect ratio you wished to have in your pictures. Take a look at the prompt below:
/imagine prompt: a cat wearing a cowboy hat and green sunglasses:: –ar 2:1
This will produce horizonal pictures, like the pictures featured in this article, you can change this to 1:2 for a vertical picture, depending on the artwork you are trying to create.
Mid Journey Tip #3
To be honest if you look at this next tip and use the website I am going to point you to, you might think what is the point in knowing the exact details of how to prompt in Midjourney, as it can all be done for me automatically. I think its useful to have a brief appreciation of what the prompts can do, but take a look at this website I found which is really good at creating and modifying prompts in different styles.
You can select various options from menus such as different styles, and change the depth of field, and quality. Once you select the qualities you want for your art it will generate a prompt which as simply be copied and pasted into Midjourney. I use it sometimes to help generate my prompts and have found it to be a great timesaver.
Leveraging the V and U Buttons in Midjourney
In Midjourney, the V and U buttons are your best friends. These buttons allow you to view different versions of your AI art and upscale your images, respectively. Once Midjourney has acted on the /imagine prompt, it produces 4 images together going from left to right on the top row and then left to right on the bottom are image 1,2,3,4, respectively. This is useful to bear in mind when using the U and V buttons which are explained below.
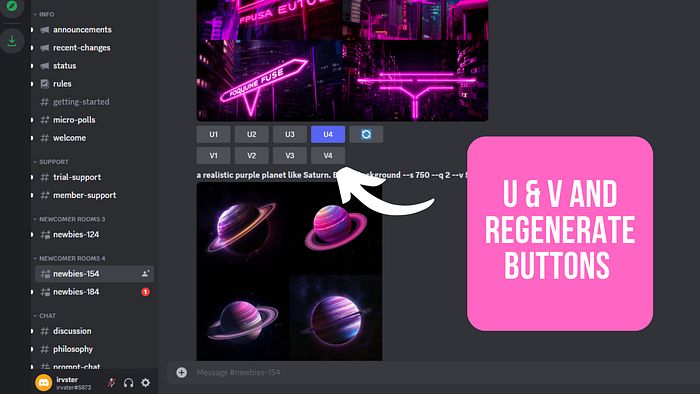
The V buttons (V1, V2, V3, V4) allow you to view different versions of your AI-generated image. Each version offers a unique interpretation of your prompt, giving you a range of options to choose from. To view a different version, simply click on the corresponding V button.
The U buttons (U1, U2, U3, U4), on the other hand, allow you to upscale your images. Upscaling increases the resolution of your image, making it clearer and more detailed. To upscale an image, simply click on the corresponding U button.
Also next to the U buttons is a button with 2 circling arrows on it, if you click this button, it will reproduce more versions of art based on your /imagine quote.

Conclusion
So there you have it, I hope that this helps you on your journey to produce some stunning artwork. Please contact us with any questions, perhaps some suggestions for future articles, or even send us some of your artwork, and we will put it up on some of our social media platforms.
Watch out for more Midjourney articles coming soon. The next one we will be doing will be to look at some of the different art styles of art you can produce with Midjourney, as well as the ability to assign your pictures different weighting, field depth and using inspiration images.
Feel free to sign up to our newsletter for some useful hints, tip and insights into the advancing AI. Also, please feel free to follow us on our other social channels, as your support means everything 🙂
Take it easy. See you next time.
LATEST POSTS